This practical guide will help you to set the ST7789 TFT Display 1,33″ to Arduino Board WeMos D1 R2 based on ESP8266 Chip.
Why WeMos D1-R2?
This board is full compliant with Arduino, has a lot of pins, as Arduino.
It is bundled with ESP8266 on-board that allows you to connect to a network through WiFi, without buy and configure another external module.
I’ve use it a lot of times in the past and I seems really cool.
However you can use any board you prefer. The results with others could require some pin/code changes.
Why ST7789 TFT display?
I’d like to try this display, because I’ve never used it before and has an affordable cost to take it a chance.
Because it has a small display, an high resolution (240 x 240) and it’s a RGB display.
Pins
First of all, let’s see which pin the display exposes:
- GND: Ground
- VCC: Power 3.3V. Beware, pinning it to Board 5V could damage the display.
- SCK: Serial Clock pin
- SDA: Serial data input
- RES: Reset pin. This pin is reset signal input. When the pin is low, initialization of the chip is executed. Keep this pin pull high during normal operation.
- DC: Data/Command Control
- BLK: Backlight control pin, must be connected to 3.3V power.
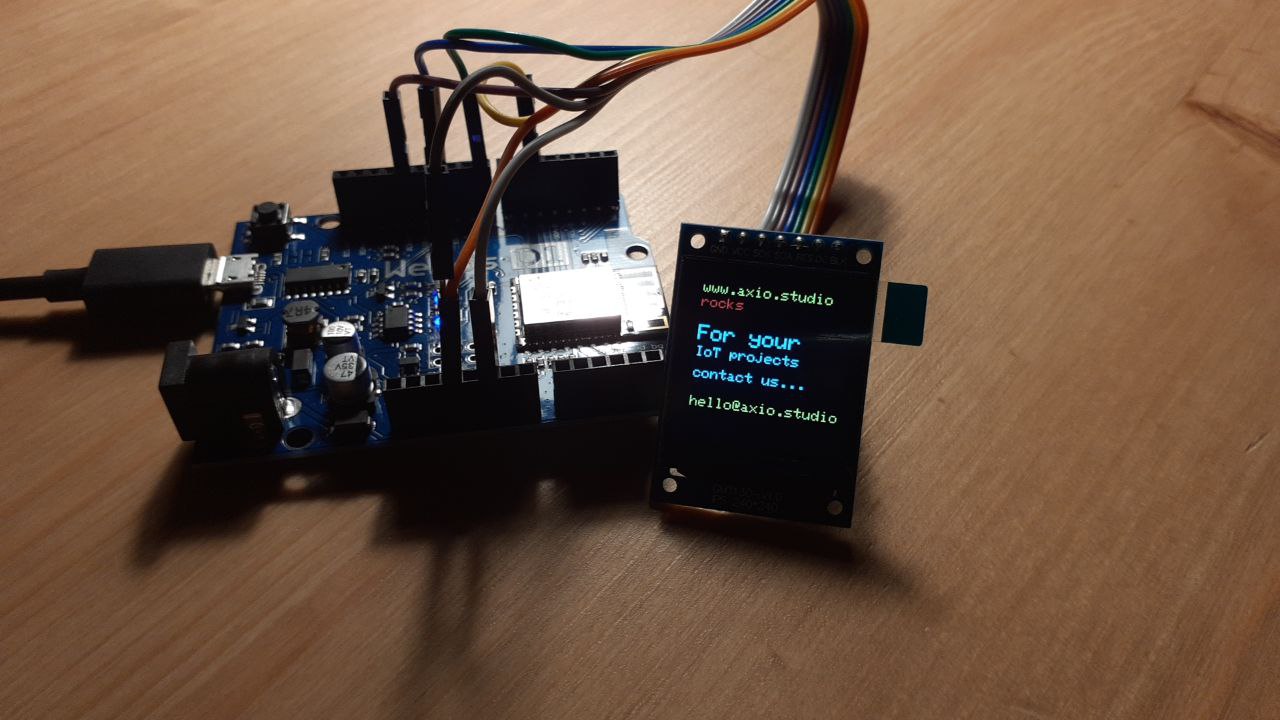
Binding to WeMos D1 R2 pins
Before realizing the right configuration I made several tests, taking care to set at least the right voltage for VCC and BLK.
Warning: Some people wronlgy report that VCC of this display need to be linked to 5V pin. Remember to connect both VCC and BLK to 3V3 Pin of WeMos D1-R2.
At the end of the tests the pin matching is (On the left the display pin on the right the WeMos D1 R2 board pin):
TFT        Wemos D1 R2
GND   ->   GND
VCC   ->   3V3
SCK   ->   SLK/D5
SDA   ->   MOSI/D7
RES   ->   D6
DC    ->   D3
BLK   ->   3V3
The RES and DC pins can be binded to any other digital pin on the board, but take care of the number to change the sketch below.
The demo Sketch
You can use your favourite editor to write the sketch, I’m using VSCode recently for that and seems to work fine.
First of all we need to include 3 libraries in our Arduino project:
- Adafruit GFX Library, as described in the documentation this is the ‘core’ class that all our other graphics libraries derive from. Install this library in addition to the display library for your hardware. In the code you will include it as “
Adafruit_GFX“ - Adafruit ST7735 and ST7789 Library that as the name descibes This is a library for the Adafruit ST7735 and ST7789 SPI displays (in the code will be included as
Adafruit_ST7789) - SPI Library, the most of real world projects with Arduino take use of SPI.
This is the header of the code:
#include <Adafruit_GFX.h>
#include <Adafruit_ST7789.h>
#include <SPI.h>

#define TFT_CS 10
#define TFT_DC D3 // change this according to one you've used
#define TFT_RST D6 // change this according to one you've used

Adafruit_ST7789 tft = Adafruit_ST7789(TFT_CS, TFT_DC, TFT_RST);

void setup(void)
{
    Serial.begin(9600);
    Serial.println(F("This is a TFT Test"));
    tft.init(240, 240, SPI_MODE2); // Init ST7789 240x240

    tft.setRotation(2);
    tft.fillScreen(ST77XX_BLACK);
    tft.setTextColor(ST77XX_YELLOW);
    tft.setCursor(20, 20);
    tft.setTextSize(2);

    tft.println("www.axio.studio");
    delay(1000);
    tft.setCursor(20, 40);
    tft.setTextColor(ST77XX_RED);
    tft.println("rocks");
    tft.setCursor(20, 80);
    tft.setTextSize(3);
    tft.setTextColor(ST77XX_WHITE);
    delay(2000);
    tft.println("For your");
    tft.setCursor(20, 110);
    tft.setTextSize(2);
    tft.println("IoT projects");
    delay(1000);
    tft.setCursor(20, 140);
    tft.println("contact us...");
    delay(1000);
    tft.setTextColor(ST77XX_YELLOW);
    tft.setCursor(20, 180);
    tft.setTextSize(2);
    tft.println("hello@axio.studio");
}

void loop()
{
    tft.invertDisplay(true);
    delay(500);
    tft.invertDisplay(false);
    delay(500);
}
If you’ve assembled everything you can compile the sketch, upload to your board and enjoy it!